✨ Elevate Your Lash Game – Because You Deserve to Shine!
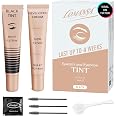
The Lash Lift Kit is a professional-grade eyelash perming solution designed for at-home use. It includes all necessary components for easy application, ensuring long-lasting curls that enhance your natural beauty while being gentle on your lashes.


B**A
SO MUCH BETTER than professional lash lift!
This turned out AMAZING. There is a big learning curve, but it turned out a million times better than the pro lash lift I got.For reference: my lashes are stick straight and go straight down. They don't hold a curl unless I use waterproof mascara—a lot like Asian lashes (altho im not asian). I've been curling my lashes and wearing waterproof mascara since I was 12, so this was huge.I have small hooded eyes with deceptively long lashes. I used the second smallest size pad (M, I think); the S was too small for my lash length, but I didnt know that till I was gluing down my lashes and I was like "Hmm." If youve ever been told your lashes are long, theyre likely too long for the smallest size. Because my eyes are hooded, I might go the next size up next time. My inner lashes are curling into my hood on one eye (pictured for reference). This is bc of me and my inexperience, not the kit itself.I got a pro lash lift for $100 eight weeks ago—the AFTER result is what I have pictured as my "before." It was awful. She didn't leave the solution on long enough; my lashes (and hair in general) are stubborn and don't take product well. I also think she did a bad job gluing my lashes down, so it was just a mess. I had to wait 8 weeks to redo them to avoid damaging them.My results speak for themselves! Im not wearing mascara in any of the pictures. Do it yourself and get it done right for a fraction of the price.However, there is a LEARNING CURVE. Here's what I learned from using the kit:1: the glue worked fine for me. In fact, it was too sticky. For those who say the glue doesn't work: oil on your lids or your lashes will make it not stick. Wash your eyes and lashes before using the kit. Wash your hands as well. I don't have oily lids at all, so I think that's why it worked well for me. But in order to remove the glue, I often had to use oil cleanser—which again suggests that oily lids/lashes will make it not stick.2: apply the glue to the pad as well as your lid before sticking it down. Make sure it's applied perfectly before continuing. I had to re-stick it down a few times to make sure it was flush with my lash line, glued down at the corners well, etc.3: The glue application is the MOST IMPORTANT PART. However you glue the lashes down will be how it perms, so if it looks bad, then redo it. I ended up having to take my lashes down, take off the pad, washing my lashes with oil cleanser then traditional cleanser, letting it dry, then starting all over again TEN TIMES across both eyes. No joke. I did it because the glue worked REALLY well for me and glued down like cement before I could fan my lashes out. This lead to my lashes clumping or laying in weird curves, but I couldnt separate them bc they were already glued together or glued down, etc. Be open to redoing it in order to get the best result! It was tedious but you don't want to end up with wonky lashes for 8 weeks that mascara and a lash curler can't fix.4: the best way I found to press the lashes to the pad is: apply a generous amount of glue to the pad, then brush my lashes up with the spoolie in a combing motion, pressing down underneath the spoolie (at base of lashes) with the tiny applicator. Press applicator gently up lashes, starting at root moving to tip. The tiny little applicator gives the precision you really need to make sure the lashes are separated. If the applicator becomes sticky, it helped to kind of press and roll up the lash until I got to the end of the pad; then I could pull it off without pulling my lashes off at the same time. Repeat this motion on the same section until all the hair is pressed down. This ensured my lashes were fanned out and separated instead of clumped together. Some hairs won't stick down in time; reapply glue as needed in spots that need it; keep brushing with the spoolie and pressing down with the applicator till it sticks. Note: The y applicator is complete garbage; it didn't comb my lashes at all, so they clumped like crazy. I looked like SpongeBob.5: after all your lashes seem glued down: no they are not lol. Do a second coat of glue in spots as needed, brushing lashes and pressing down with applicator to get those few random lashes that didn't get pressed down.6: under eye pads just stabbed me in the eye. I didn't use them and didn't get solution in my eyes. I think if you cut them to fit, it'd work, but I don't know how to do that lol. I ripped them off every time I tried to use them. If you can use them, that's obviously preferable and power to you!7: once your lashes are glued down, you're in the home stretch! Make sure they are CEMENTED to the pad. Glue is your friend.8: have Saran wrap ready. Apply perm solution (I feel like I was pretty generous and really tried to glob it on cuz I know my lashes are STUBBORN); try to apply it to base and mid lengths without going to tips. Some of my lashes came unstuck at this point, but 95% were still stuck down. I think if id stayed away from tips and glued down better, no lashes would have moved.9: apply Saran wrap to lashes: press down, then kinda pull up so the Saran wrap is pulling lashes up. This can help any hairs that became unstuck.10: PRESS YOUR PALM TO EYE WHILE IT ACTIVATES. The heat helps I swear! Especially if you have stubborn lashes.11: Wait the full 10 min if you have stubborn lashes. I kept my palm on my eye the whole time. No regrets.12: take off Saran wrap, wipe off solution with cotton swab without moving lashes, then apply fixing solution. THIS IS WHAT LOCKS THE HAIR IN PLACE. Whatever shape your lashes are in with the fixing solution is how your lashes will look! So again, apply generously to your still-cemented lashes, apply Saran wrap by pressing and pulling up, keep your palm there for 10min, and relax.13: wipe off solution, and you're in the home stretch! Apply tint now if you want to—that part got in my eye, so thats why my eye is red and irritated in my after pic. Apply nutrition coat, wait five min, then clean it off with cleanser (step 4). Press a cotton round (or toilet paper lmao) into your lashes gently to dry. Fan with spoolie to see your results ✨️14: SUPER SUPER IMPORTANT: you need to make sure you REALLY clean off the glue at the end! If you have leftover glue in your lashes, the fixation solution can stick to it, and IT WILL KEEP CURLING YOUR LASHES! You don't want that! Take your time and REALLY clean your lashes with the solution provided. I think part of why my lashes overcurled is because I didn't do a good job of this on one eye.Overall: big learning curve but AMAZING results. I'll be a repeat purchaser of this kit. I was considering using lash serums (like latisse) cuz I wanted my lashes to look fake and touch my brows. This lash lift kit gave me the exact effect I was looking for, no lash serum needed!
R**E
LIFE CHANGING
I have had straight lashes my entire life and they have never held a curl. Now my lashes are beautiful and it has changed the GAME girls. I’ve been doing this for months and I’ve gotten pretty good at it so here’s my advice.Tips: (1) *MOST IMPORTANT* The solutions seem to lose efficacy quickly. I use a pack twice MAX and then toss it and buy a new one. Even on the second application they’re less effective. This took me way too long to figure out. I’m fine with buying new ones! (2) After you’ve applied the glue to the pad, don’t use a tool to smooth your lashes onto the pad. Use your finger. This helps me to get my lashes laid perfectly! Also wait a bit for the glue to dry because the drier it is the easier it is to get them to lay. (3) Make sure they’re CEMENTED with that glue before you apply perm solution. If you think they’re glued on enough, they’re not. Apply more. It’s not that hard to get off (I use micellar water and it comes right off!). (4) Don’t put the pads directly on your lash line, leave a BIT of space. When the pads are touching your lashes it gets in the way when brushing them up.I use the second thinnest pad also. Good luck girlies!
L**J
UPDATE - made my lashes look terrible!
Don't waste your money on this!I have used the other more expensive brand of lash lift with no issues. That other kit ran out so I bought this brand because it's cheaper and delivery would be faster. But you get what you pay for. This stuff works but only barely. My lashes look maybe 25% as lifted / curled with this kit compared to the other brand.**UPDATE--I wrote this review a few minutes after I had cleaned my lashes after "lifting" them with this kit and comparing my before & after photos. Now less than an hour later, my lashes have relaxed back to their "before" state, so this lift kit did not work AT ALL! **I'm pretty disappointed. I may try this kit again in 1-2 weeks and heat my lashes with the hair dryer during the perm and fix steps to see if that helps. The glue worked fine for me, and the tools in the kit are fine as well. The instructions are mediocre--I was able to follow them only because I've done lifts on my lashes 5 times already. If I hadn't had experience with lifts, I would have needed to watch a YouTube video to understand what I needed to do.**2nd update-- about 5 weeks later, I've tried lash lifts with this kit 3x and it still does not work. I added heat to the perm and set/fix steps, and I believe the perm solution works with heat, but the set/fix step does not! Man of my lashes continued to curl for a day after I used the kit, so now some spots in my lashes look like tiny loops while others are straight. This kit is TERRIBLE!
Trustpilot
1 month ago
2 months ago